Moving or migrating your WordPress website from one server to a new one can be pretty intimidating, especially if you’re not overly technically minded.
If that’s you, then this guide is squarely aimed at you. You don’t need to know any technical terms and apart from some basic understanding of using WordPress and a little patience, there’s nothing else you need to get started.
The plugin we’ll be using today is called Backup & Migration & Unused Images Cleaner by WPVivid Backup.
Best of all, the plugin we’ll be using is totally free.
Now, before we get started there are a couple of things you need to ensure to make this process goes as smoothly as possible.
Firstly, dedicate enough time to not only getting both the source and destination sites ready but to allow the whole process to complete without stressing.
If you’re in a rush, leave this process until you have more spare time. There’s nothing more frustrating than starting the migration process and realising it’s going to take much longer than anticipated and you have to be somewhere else.
Secondly, make sure you have adequate space on both the source and destination servers for the whole process.
The process involves taking a full backup of your site then transferring that from the source server to the destination server. If you don’t have enough space for this along with the space to allow the files to be uncompressed, you can run into issues.
If you’re unsure, reach out to your hosting company and ask them how much space you’re currently using and how much space is available on your account.
As a general rule of thumb, you want to allow about 3 times as much space on the server as you’re currently using.
For example, if your website is using 500Mb (megabytes) you’ll want to make sure you have around 1500Mb or 1.5Gb (gigabytes) in total available.
Okay, with that covered, let’s move on to Step 1 of How To Migrate a WordPress website.
Step 1 – Install Backup & Migration & Unused Images Cleaner
The first step is to install Backup & Migration & Unused Images Cleaner on both the SOURCE and DESTINATION websites.
You can do that by going to your WordPress Dashboard > Plugins > Add New and search Backup & Migration & Unused Images Cleaner.
Click the Install Now button and once downloaded, click Active and the plugin will be installed and ready.
Once activated, if you’re not automatically taken to the plugin’s settings, you can simply choose WPVivid Backup from the left menu in the WordPress dashboard.
Step 2 – Generating Your Migration Key
Switch to your DESTINATION site.
Now, select the Key tab from the tabs at the top of the plugin screen.
This stage only has 2 options that we need to set. Firstly, you can set how long the key we are going to generate will last before it expires.
This is simply to ensure that the key will not be available to be abused or used by someone else to take a copy of your website.
Set this to a value you feel will give you enough time to complete the whole migration process.
Next, click the Generate button to generate your unique migration key.
Copy that code (ensuring you copy ALL of the code) and move on to Step 3.
Step 3 – Using The Migration Key
Now you have your unique migration key, switch back to your SOURCE website and open up WPVivid Backup if it isn’t already onscreen.
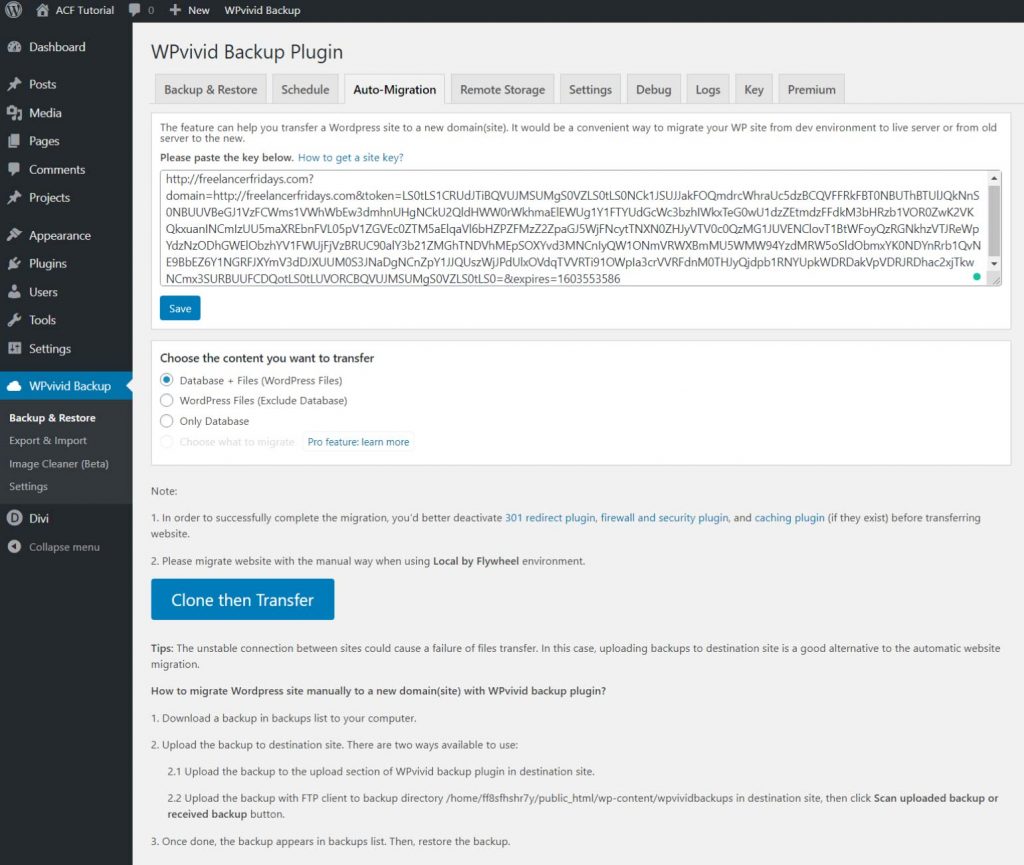
Switch to the Auto-Migration tab and paste the code you’ve just copied into the designated text area.
Next, you can choose exactly what you want to clone and transfer. For this example, we are going to transfer the entire site and database.
Select the first option and then click Save.
Click Clone then Transfer and wait for the process to complete.
Step 4 – Restore your Migrated Website
Now that has completed, we’re ready to switch back over to the DESTINATION website and complete the final step.
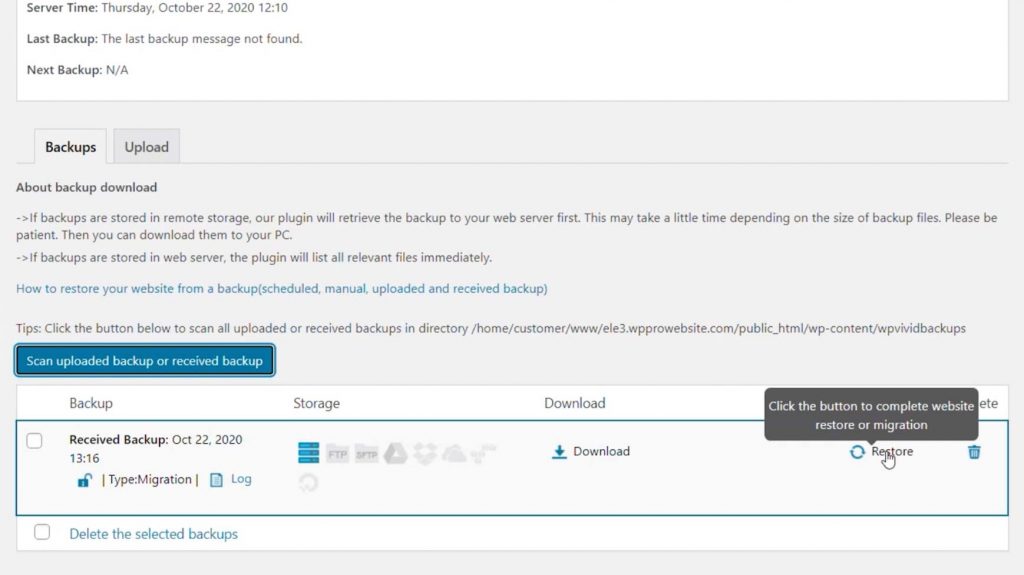
Open WPVivid Backup and choose Backup & Restore.
Scroll down the page until you see the Backups & Uploads tabs. Select Backups and then click the Scan uploaded backup or received backup button.
That will scan your destination server for a backup. This should show up pretty quickly and our file is ready for the final part of the process. Restoring (or completing the migration).
Click Restore next to the newly received backup and wait for the process to complete.
This may take some time depending upon the size of your website. Sit back, have a drink and wait for the process to finish.
Once completed, your migration should be complete.
At this point, you’ll be logged out of the site’s Dashboard and you’ll need to re-login with the login credentials from the migrated site (remember, we’ve just overwritten the original destination site with our source site).
Wrapping Up
That’s the process completed. Our WordPress website migration to another server is completed!
I’m pretty sure that wasn’t as scary as you may have originally thought.
If you want other great tutorials on getting more out of WordPress, don’t forget to subscribe to the WPTuts YouTube Channel and join the WPCrue Facebook Group.
Useful Links
- WPTuts: https://wptuts.co.uk
- WPCrue Facebook Group: https://www.facebook.com/groups/wpcrue
- WPTuts YouTube Channel: https://www.youtube.com/c/wptuts


